 woodenspoons
Chicken and Veggie Soup
For the first time in about 20 years, I didn’t make chili on Halloween this year. I am not really sure why…perhaps because it was a bit warmer than usual, or because we had it not all that long ago…I don’t know…but this year I made Chicken and Veggie Soup with a Honey Cornbread on the side. It was delicious! It was easy! And of course…I made extras to freeze for another day when we are in need of a fast meal.

So…I just kind of winged this recipe….you can make it as is or add or take away what you like or don’t like. Here is what I did…
Chicken and Veggie Soup
3 lbs. chicken breasts, seared, baked then chopped into bite-size pieces
2 Tbs olive oil
2 Tbs butter
12 ounces diced onions
4 cloves garlic, minced
5 stalks celery, diced
5 large carrots, peeled and sliced
3 containers chicken broth
(add more or less until you get the consistency of soup that you like)
1 can diced green peppers
1 can white beans, drained and rinsed
1 can black beans, drained and rinsed
1 large can diced tomatoes
2 cans corn, drained and rinsed
2 Tbs dried parsley
1 tsp. cumin
1 tsp paprika
1/2 tsp smoked paprika
1/4 cup chopped cilantro
Melt the butter with the olive oil. Add the onions and cook until translucent. Now add the garlic and cook until cooked through but do not brown. Add the celery and carrots and let cook with the onion mixture for a few minutes. Now add the broth, peppers, beans, tomatoes, corn, parsley, cumin, 2 paprikas and cilantro. Allow to simmer for 45 minutes or until the veggies are fork tender. Serve as is or add rice or noodles.
What did I love about this recipe? It was easy and I had everything in my refrigerator already so it came together in a SNAP!
What didn’t I love about this recipe? Not a thing!
Share this:

Lime Basil Shrimp
Fridays are my favorite day to cook. I teach until 6:30 Mon-Thursdays so whipping up something that takes longer than 15 minutes from start to finish is definitely not happening here. (think leftovers and making ahead)
Tonight I am going to make shrimp for dinner. I am just using some basil from my garden, juice of a few limes, tomatoes, garlic and Dijon, butter and olive oil. I even added a can of white beans…How can it go wrong with such amazing and fresh ingredients? Yum…
Basil Shrimp
2 Tbs extra virgin olive oil
1/4- 1/2 cup butter, melted
1/4-1/2 cup lime juice
3 Tbs. Dijon
1/2 cup basil, chopped
4 garlic cloves, pressed
salt and pepper
2 1/2 pounds shrimp (cleaned)
1 can white beans, rinsed
2 tomatoes, diced
Add everything except beans and tomatoes to a baggie and allow to marinate for an hour. Add all contents to a large, hot skillet and saute until the shrimp are almost done. Add the beans and cook until heated through and the shrimp are cooked.
Serve on top of pasta, rice, quinoa or couscous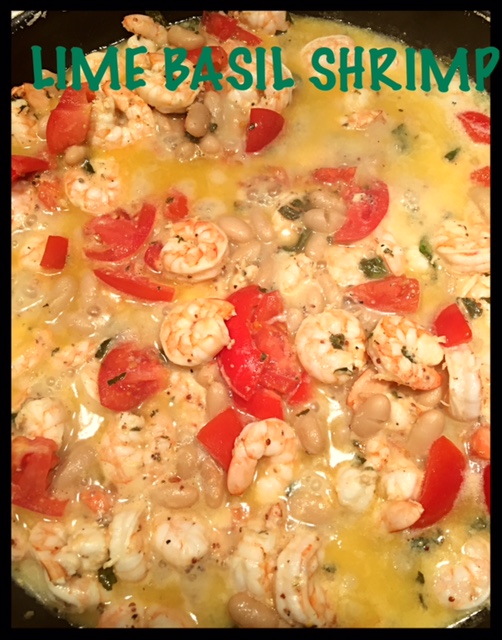 .
.
YUM. Keeper!
What do I love about this? It is make-ahead and it is one pan…two of my favorite things!
What don’t I love about this? Come on….NOTHING!
Share this:

Crustless Pumpkin Bake
WHAT????? Middle of October already? How can that be???!! Well, I have a serious Pumpkin Thing going on so I am whipping up a crustless “Pumpkin Bake” as I type this. I didn’t want all the crust of a Pumpkin Pie and actually didn’t want any KIND of crust…just the pumpkin part!
So……I simply whipped up my favorite recipe for Pumpkin Pie—using only the “innards” (that sounds nasty) and poured it into a square glass pan which I sprayed with a non-stick spray. I preheated the oven to 325 degrees and baked for about 43 minutes. (when a knife comes out clean, it is cooked through).
You can double this and bake in a larger pan as well…Baking time will be much longer…at least 80-90 minutes depending on your oven and pan. Just bake until done then remove from oven. Serve warm, cold, plain, with whipped cream or with ice cream.


***HINT…I go heavy on the spices in my pumpkin pie. I always add a pinch or two more than what the recipe calls for…and I always add about 1/4 tsp freshly ground black pepper…you can’t taste it but it gives it a great flavor!***
What do I love about this recipe? It is PUMPKIN, PEOPLE!!!! EVERYTHING!
What don’t I love about this recipe? It is PUMPKIN, PEOPLE!!! NOTHING!
Share this:

Make Your Own Cobb Salad Bar/Pumpkin Creme Brûlée
Happy Monday, Everyone!
What a fun weekend I have had! Thursday night I shared with you….that was the evening my girlfriends came for dinner with a wonderful Nicoise Salad. We had a lot of laughs and made some happy memories in my new kitchen. I made the Rustic Wood Runner for the dinner table which I love!
Last night, I had my sweet friend Marina and her girls to dinner. I had no idea what to make for Ella and Luca, so I decided on a Make Your Own Cobb Salad Bar and Caramelize Your Own Pumpkin Brûlée for dessert. It was so fun and so easy…and the BEST part is that it was all made ahead of time!
I made the pumpkin creme brûlée the night before (using Chef John’s recipe found on http://www.allrecipes.com) and allowed it to come together and chill for a day. Yesterday morning, I made and chopped all kinds of things for the Cobb Salads…hard boiled eggs, thick, cooked and crumbled bacon, cucumbers, green onions, tomatoes, blue cheese, roasted chicken, pumpkin seeds, sunflower seeds, tomatoes and avocados. I cheated a little and bought a few quality bottled dressings since I had no idea what kind of dressing everyone liked. I put everything on the kitchen island at dinner time and let everyone make their own salads. It was easy and everyone could take exactly what they liked. We ate outdoors under sparkly lights until we went in and asked Luca to play our piano and sing for us. She is amazing!
After she finished a little mini concert, Ella we decided it was time for dessert. My young friend, Ella, likes to cook (and I hear she is an amazing one!) so I knew she would enjoy using the kitchen torch to caramelize her Pumpkin Creme Brûlée herself. She did hers to perfection! Check her out in action below!


The entire meal was so easy and it is always fun to throw something kind of playful together for the gang!
HAPPY PUMPKIN SEASON and special thanks to my friends for allowing me to share them on here!
Love,
Shelly
Share this:

Easy Wooden Table Runner
Hi All!
So….. while my pumpkin bread is in the oven for my husband to take to his Mom, I thought I would share this cool idea for a table runner today! I saw this idea on Monday night’s perusal of Pintrest and thought, “Oh, can make that and use it for my dinner party with the girlfriends!”
I am going for a rustic, clean, autumn look and think a wooden runner is a great idea for the table. I am making at least two of them…a gray one for tonight’s party and a dark chestnut one that I will use for Thanksgiving and Christmas. This project was super easy and fast! Simply measure your table, decide what size board you want, sand, distress, sand, stain and polyurethane!
Isn’t this cool?
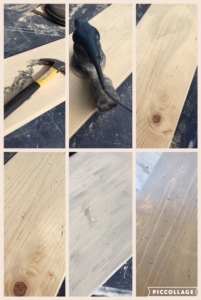
EASY Rustic Wooden Ru
I don’t have the table completely set yet, but it is nearly done…still looking for fillers for my centerpiece. I will take a few more pics and try to include them in my next post.
I am so looking forward to having my friends here for dinner tonight. (minus one…boohoo…) We have been friends for over 19 years. We met when our daughters were in the same Kindergarten class and have remained close ever since. How lucky am I to have this amazing group of women as my friends? Damn lucky. I know this and count my blessings. So here is to them…Val, Sue, Caroline, Kris, Bia, and Melinda! CHEERS!

Share this:

Hey All!
Hi Everyone!
So sorry it has been soooooooo long! We started a major kitchen remodel which led to an entire house remodel…It is nearly done and I am finally finding myself in the kitchen again. It was a long summer not being able to cook, but was also, quite honestly, a nice little break as well! But… now I am back and am going to change things up a bit!
I am still going to put my own twist on recipes, but I will also share some that are not my own! It is fun to find a keeper and share it. So, I will do that with you (with credit to the original cook). I am also going to throw in some other things I am learning and planning and sometimes just thinking about!
For now…I am planning a get together on Thursday night with my girlfriends. I want them to see my new kitchen and to start making some new memories in it!If there is one thing I know for sure, it is that my girlfriends know how to make good memories! For now, I am gathering fun autumn things to use for the decorationas and the table. I love this part! So fun! Check it out!

Thanks so much for hanging in there with me!
Shelly 🙂
Share this:

Chicken Taco Casserole
Hi Everyone! Here comes the weekend! Here in CA, Spring is definitely showing her face…daffodils are popping up, fields of mustard are blooming, flowering trees are showing off, and the grass is starting to grow again. Thank Goodness we got some rain this year to help the drought situation. If it isn’t spring where you are yet…don’t worry, it is coming, I PROMISE!
In the meantime…let’s talk casseroles. I know I have mentioned before that I am not a huge fan of casseroles, but alas…my husband is! So…I do make them occasionally. Today I made a double batch of a Fast and Easy Chicken Taco Casserole. The beauty of this is that I already have one in the freezer (these come together so quickly) for another day, and I have one ready to bake later today. The other great thing about this recipe is that it is soooooooo forgiving. You can change it however you want to…add sour cream in place of the Greek yogurt. Use prepared taco seasoning instead of your own! If you don’t like cilantro…don’t add it. (same with the rice) Only have two can of black beans? And no kidney beans? No worries add what you like…whatever…it is a casserole! Everything gets all mixed together! I urge you to just wing it. Let me know what you think and how you make yours.

Super easy to throw together and is easy to make your own by altering the ingredients!
Chicken Taco Casserole
(makes 2 -13 x 9 inch pans)
3 cups Minute Rice made with 3 cups chicken broth (or use water)
2 lbs cooked and chopped chicken (I used rotisserie chicken)
1 can cream of chicken soup
1 jar chicken gravy
1 can Rotel diced tomatoes
1 cup Greek yogurt (or sour cream)
1 can corn, drained
1 can black beans, drained and rinsed
1 can kidney beans, drained and rinsed
2 1/2 Tbs taco seasoning
1/2 tsp ancho chili powder
(if you like things spicy…add some cayenne, or jalapeños, etc)
2 cups of grated cheese, separated…I used 4-cheese blend (use more if you like it super cheesy)
cilantro…I used about 1/4 cup…use more or less depending on your taste
broken taco shells, tortilla chips, tostada shells….or none at all!
Preheat oven to 350 degrees. Spray bottom of pans with cooking spray. Add half of the rice to each pan. Combine all of the ingredients except for 1 cup of the cheese and the broken taco shells. Pour onto the rice and spread it out evenly. Top with the cheese. Cover with foil that has been sprayed with cooking spray. Bake for 30 minutes then remove from the oven and remove the foil. Top with the broken shells or chips. Bake another 10 minutes. Remove from oven when cheese is melted and gooey. Let the casserole sit for 5-10 minutes before serving. EASY PEASY!
What did I like about this recipe? Well, I love tacos and this is a great way to make them ahead of time and to only have minimal cleanup after dinner. I also liked that I made 2…one for later or to share.
What didn’t I like about this recipe? Really…nothing. It was tasty and easy. I guess it isn’t the healthiest thing in the world, but …….
Share this:

Chocolate Covered Strawberries
 Source: Chocolate Covered Strawberries
Share this:

Drying Herbs/Dried Oregano
Hi All! What a weekend! Here in northern CA, we had a gorgeous weekend just loaded with warmer temperatures and sunshine! 🙂 That was all I needed to get myself outdoors and into my garden. I didn’t do a lot, but I did pull some weeds and rake out some of the leaves that had fallen into the beds. When I looked down at my herb garden I couldn’t believe how much oregano I had! Holy Cow, it was taking over!!! I didn’t have the heart to throw it away so I did a bit of research about drying herbs. I didn’t really feel like hanging them to dry…I don’t have the patience for that! What I found out is there are some herbs that can be dried slowly in the oven. Evidently you can dry oregano, parsley, sage, thyme, mint and basil…plus more…in the oven at a very low heat. So…away I went and dried 7 cookie sheets of oregano!
Here is how I did it. First, I carefully picked the stems, being careful not to bring any soil with the plants. Then I put the oregano on cookie sheets and preheated my oven to 180 degrees (some ovens don’t go that low…you can still dry the herbs…just have to keep a sharp eye on them). You need to be sure there is plenty of space around them so the air can circulate evenly.

This is how I put the oregano on the sheet.
Secondly, I put them in the oven after it was preheated. I left them in there for about 10 minutes or so then turned the oven off and just let them dry in there. I did check them at around 30 minutes to see if they needed more heat. Some did, so I kept those on the sheet and removed the dried. This is how they looked after they were dried:

This is how the oregano looked before I took it off the stems.
Finally, I got a big bowl and gently slid the leaves off the stem with my thumb and forefinger. They should come right off and crumble. Any herbs that didn’t seem dry, I simply threw back into the warm oven. After the herbs were cool, I put them in mason jars.
See? Easy as can be!

TADAHHHHHAAAAA!
And THAT my friends was fast, easy and YAY…my very own oregano! Next up…Thyme!
Do you dry herbs too? If so, which ones?
Happy Monday!
Shelly 🙂
Share this:

Brussels Sprouts
First of all, okay…how about that spelling? Who knew that you spelled “Brussels” as in Brussels sprouts with an “s” on the end…and no apostrophe with it? Hammy…seems weird, but oh well!
We went to a new place in town for dinner last night, and on the “Sides” menu were Brussels Sprouts. Being that the hubby is a new fan of the little green veggies, we decided to share an order. They were so good! These were served with a side of a lemon aioli, but they would have been just as good alone!

These bad-boys are so good for you! They are loaded with Vitamin C, Vitamin A, and Vitamin B-6! Add to that— they are a great source of dietary fiber, and we have a winner! What is your favorite way to eat Brussels Sprouts? And…by the way…don’t tell me you do not like them…I think you need to try them again! They say your palate changes every 5-7 years. I don’t know if that is true or not, but if you haven’t tried them, you should! (and ignore the off-putting smell.)
Have a great day!
Shelly

